
Due to image sizing issues I updated this pattern to a pdf file on May 7th, 2009 and also included a sizing chart so that you can adjust the pattern to fit your baby specifically.
I apologize to those of you who have attempted this pattern only to discover the pattern was too small. It was posted only as a gift for your enjoyment.. not as a source of frustration. Again… So sorry.
A few weeks ago I talked about a pair of baby shoes that had been collecting dust in my craft closet. Those shoes were ripped and traced and are now a very simple and quick pattern for new born infant shoes. Judy at Apron Strings has shown some interest in the pattern so I thought I would share it.
Bare with me on this.. this is my first tutorial.
Materials needed for these shoes…

* 1 9X12 sheet of felt with equal amount of fabric
(or if you want all felt or all fabric just double your amount needed. But if you use all fabric you’ll need to add a layer of stabilizer)
* 2 snaps
* Desired embellishments.
* About an hour of your time
click pattern for full size (size chart included)
Step #1 Preparing your pattern
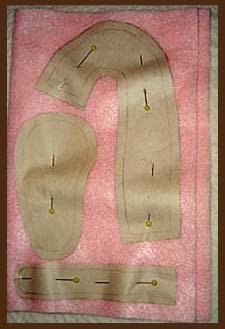
fold felt sheet in half and pin your pattern.
Cut.

You should now have your outer layer of both shoes.
Step #2

Repeat step #1 but use your coordinating fabric.
Step #3 Preparing your soles

For the sole of your shoes sew one layer of fabric to one layer of felt. It is important to make sure that you have a sole for the left foot and a sole for the right foot.
Step #4 Preparing upper portion of shoe
For the main portion of the shoe layer felt and fabric in the same way you did with the soles. One for the left one for the right.

After you finished sewing them together turn them right side out and finished it with a single stitch across the top portion. This helps hold the two layer in place and gives it more stability.

Step #5 Sewing sole and upper portion together

With right sides together, match starting point of upper portion to starting point of sole (this is the big dot on the pattern) and pin both together all the way around the shoe. You should have an overlap where the two edges meet together.
sew
Then turn right side out and sew up overlap
Step #6 Sewing & inserting strap

With right side together sew strap, leaving the end opened. Turn strap right side out (this is time consuming… you could use ribbon)

Now Turn shoe right side out. On your pattern piece I’ve marked a star… this is where you will insert the strap. Carefully rip a small portion of the seam and insert your strap. Turn inside out and sew section back together being sure to catch your strap.
Then snip off the excess
Step #7 Adding your embellishments
I used small snaps on my straps for closure.. you could use cute little buttons or even velcro.

Choose the embellishments to your taste. I like flowers but I’ve also used a felt baseball for a boy.. you could embroidery words or pictures, or use ribbon… for this pair, I thought the fabric alone was best.
As I said before, this is my first tutorial. If something is confusing feel free to email me and I’ll do my best to be more clear.


Thank you so much! The weather cleared, and I printed out your pattern. This will be my next project. I’ll post my outcome and let you know it’s there when I finish it. It could be a day or so depending on the weather and “what ever will be”…
I appreciate you taking the time to do this and hope others make some of these darling little shoes.
Hello,
I´m a german mother. Today I surfed through the wites of the internet and found your great tutorial. I love making baby shoes, sewing or knitting. I`m going to print it out, to be my next project. Therefor it`s your first written tutorial, you made it great ;o) .Thanks!
(I hope you`ll understand my worse school english ;o)
Hi, cute shoes! I’m having trouble getting the pattern to come up full size? When I click on it, I get a bigger version, but it’s still too small for a baby? Suggestions? I’d love to try these out=)
Thanks.
You know, you are the very first person to tell me this. I thank you. I will re-scan my pattern and post it as an pdf…this seems to work better. It might take me a day or two to get it done but I promise to do it.
Have you or anyone ever enlarged this pattern? It is very small, and I was hoping to fit it on my 4 month old grandaughter, but I’m not very good at sizing patterns. I have spent alot of extra hours for naught.
Thank you
I can’t wait to try these out . . I’ll be checking back for the PDF version=)
Hi Judy,
I posted the pdf file this morning. Again, I just want to thank you for letting me know there was a problem. I’ve had over a thousand people look at that pattern and you are the first to let me know there were issues. I appreciate you.. and your kindness :).
These are adorable! I’m printing the pattern right now so I can make some for my 2.5 month old DD. 🙂 Her feet are too small to fit even the size 1 shoes from the store. Now she can have shoes.
You are welcome=) I know I always appreciate it when people point out inconsistencies in my own blog. How strange that NOONE had mentioned this before! So now I’m sitting here trying to figure out how to size the pattern up. I think I can work out the sole and the strap . . . it’s the upper portion I’m not sure how to size. Any suggestions? TIA!
Hi Goosie Girl,
I just stumbled in your blog and I fell in love with your DIY tips. As a Mom myself, I want my baby to have the most unique pair of shoes and I can’t wait to make one for my baby. Thanks a lot for the tips. Also, hope you don’t mind, I also posted the guide in my site. =)
Thanks a lot!
*Thanks Ava.. I’m glad you like them! Sure, it’s fine that you link back to me. I hope your readers will love making these little Mary Jane’s as much as I do.*
Hai, i’m a Sri Lankan mom and first of all thanx for the tutorial. Its a lovely shoe. i will be working on it tomorrow after printing the patterns. I would like to post a picture of a shoe I made yesterday from an old shoe design.
But can somebody please direct me how to add a picture in here.
*I’m sorry, I don’t have a flickr group set up for baby shoes but finding a group for handmade items is easy.. just got to http://www.flickr.com, set up an account (if you haven’t already), and search groups… “I made it myself” is a great group. If you still need help just let me know. – Renee*
hi…
I’ve a 2 year-old boy and a 3month baby girl. I stumbled across ur site while googling for something else. Now I’m excited to start on this project for my baby.I’ve printed the pattern n tutorial. Can’t wait for the weekend to get the supplies I need to do this project…… Thanks for posting the tutorial and the pattern….
Hi Goosie Girl
I am very excited to find your pattern for the Mary Jane shoes. My daughter and I purchased fabric today so I can make them. I’m confused – how do I make the pattern larger. If I make the sole larger don’t I have to make the upper portion larger. I see the size chart, but I must be missing info or just not seeing it. I looked at all your comment, but don’t see any with the question I have.
Thanks so much for your help!
*Hi! I’m exciting that you’ll be using my Baby Jane’s shoe pattern. I hope it will work well for you and your daughter. My simplest suggestion for enlarging the pattern would be to enlarge with a photocopier machine. If you don’t have access to one, you’ll need to enlarge the upper portion and strap equally to the amount that you enlarge the sole.. in other words, if your sole increases by one inch, so will everything else. It takes some figuring, I know :)..two things to keep in mind, it needs to be increased evenly.. one inch will be a half an inch on both sides and half an inch on top and bottom. Make sense? The other thing to remember: If the shoe is larger you might also need more fabric. That really depends on how large you go. Hope this helps.*
Thank you for posting your wonderful patterns and ideas. We have recommended your site to multiple friends of ours.
Much love,
Inspire Collective
been looking for a tutorial to make these for the new babies at church!! This is exactly what I was looking for, thanks so much for your time in making this I can’t wait to start sewing!!
thank you sooooo much for this!
Renee
Thank you for publishing this pattern! I am VERY dense…If I print the pattern from my computer at 100%, do I then have the pieces the right size for a size 1 shoe? Is there then a method to print it out in a size 2 or other size?
Thanking you for your time
Patricia
Thank you for publishing this pattern? I am VERY dense…If I print the pattern from my computer at 100%, do I have the pieces the right size for a size1 shoe? Is there then a method to print it out in a size 2 or other size?
Thanking you for your time
Patricia
*Hey Patricia, When increasing the size of your pattern, first you need to cut the shoe sizing chart off your pattern.. the chart is true to the sizes indicated.. then just blow up the pattern so that it equals the size you’d like. My chart is for month sizes only but I’m sure you could search for a child’s shoe size chart online and come up with one. I hope this helps. Happy sewing! Renee*
Hi Renee
Step #6 – I had the same trouble when trying to turn the skinny back tie on a bib. Try using the non pointy end of a pen or pencil to push it thru. My mother-in-law showed me this trick and it was SO MUCH easier!
I love these shoes!
Ange
Thanks!!!!
I just found this tutorial and I love it! I’m definitely going to try it. Thanks for sharing. I must say, however, that I got a real kick out of the spelling of BEAR as BARE. Hmmm.
Thanks, I’m pleased that you like it. Be sure to measure the foot on the chart before you begin. Size doesn’t necessarily mean age. These were originally doll shoes that I adapted. & Oops! Sorry about the spelling. Spell check doesn’t catch those type of mistakes, does it? Thanks for stopping in!
Hi this is a lovely tute for really adorable shoes. I need to make one for my friend’s daughter who will be one in the next two months or so. Havent seen her yet so am thinking she would be a size 5 on your pattern. How do I resize the pattern you’ve drawn out?
I usually do it by increasing the copy size on a copy machine… it’s the easiest way, hands down.
Thank you for this, I cant wait to make some for my baby nieces! Great jobv and so cute!!
hello – I love these shoes but i cant figure out how to download the pattern… Cant wait to try to make these for some friends, my girls are way too big but i love doing little girl things…… Thanks – Amy
me again – i figured it out – thanks…..
My mom taught me to use my sewing machine this morning and this afternoon I made your shoe!!!!! Very cute and very easy!
That is so awesome! I feel honored that you made something of mine. I hope you’ve fallen in love with sewing and continue to create. I recently made The Sorgetto Top … posted about it today.. It is very easy and perfect for any beginner. I totally recommend giving it a try. & thanks for visiting my blog and sending me a comment of your great news!!
For anyone with size trouble, the way I changed the size was by estimating how much bigger I wanted it than what originally printed, hitting “print screen”, and opening Microsoft Paint, which most have in their Accessories or use a similar program, Paste, then crop the pattern and drag it to be about however much larger you need. Then print again. This meant I had to cut and tape a couple of pieces of paper together, but it worked!
Hi, GG… I’m nyna from Indonesia…
really thankfull for you, its a great pattern, i’m getting to print out this one…
thank u GG,,,
Bali’s Sandal
Hello I have been trying to figure out how to get the PDF pattern. I click on the link and all it does is takes me to Google documents but no pattern. Please help me?
Wow, that’s great! And you explained so good! Thank you!
How do I know how much to enlarge it for the next size? Thanks so much these are adorable.
Hi Renee… Mmm a bit blonde here… do I increase all the pattern pieces or just the sole… Confused… also can I add the cm onto pattern pieces instead as no photocopy on hand… thanks a mil… K
I can’t wait to make these for my new grandbaby girl, due in December. I have looked for a maryjane pattern for hours. Thank you, I think your directions will be easy to follow.
I LOVE this pattern and cant wait to sew it together tomorrow. I had enough fabric leftover from a sun bubble suit and hat set to make a pair of matching shoes-my daughter swears my 2 1/2 month old granddaughter has four inch long feet, so I will attempt to make these with a little elastic slipped in the heel seam to guarantee a good fit.
If you want to enlarge the pattern, you should first slice the sole pattern across the width of the shoe about midway down about where the baby’s arch would be (yes, I know they’re mostly flat footed but you get the idea) and slide apart or together if you need to shrink the pattern, until the length is right, and pin in place on another piece of paper. Trace to create the new size pattern. For the upper, measure how far you had to move the sole apart and slice the pattern for the upper about a half inch in either direction from the heel bump of the center back (where the 4x is on this pattern, measure about half an inch left and right and cut the pattern twice). Each side needs to be elongated half the distance that the sole was separated to keep things even. I wouldn’t recommend changing the toe part, unless you made the sole wider, then you would need to ease the pattern from the center front to match. If you need to deepen the shoe, you could add a little more width to the outside edge, but again, I wouldn’t do much to the toe’s profile-it looks like it would be just about right for most little feet.
If you want to use just fabric what can you use to stabalize the shoe to hold its shape. Something inexpensive!
Hey! I know this is kinda off topic but I was wondering if you
knew where I could get a captcha plugin for my comment form?
I’m using the same blog platform as yours and I’m having problems finding one?
Thanks a lot!
I know this if off topic but I’m looking into starting my own weblog and was wondering what all is required to get set up? I’m assuming having a blog like yours would cost a
pretty penny? I’m not very internet savvy so I’m not 100% positive.
Any tips or advice would be greatly appreciated. Cheers
I’ll try this tutorial. Thanks for sharing!
Sewing for my newborn granddaughters bitty baby doll. The nightgown came out so cute that I am darn tempted to make one bigger just like it for the real baby. But I hae itd no bootie pattern. And patterns are expensive. Thank you so much for your pattern. I will have it printed and use it.
Baby shoes are v beautiful.here I would request all the people who teach dress making or shoe making please give the cutting pattern in inches or cm,as in Asian countries printing a printable pattern is not easy as we don’t have easy access to printers.so if u give a pattern in inches or cm we would equally be nifty as those having printers at their homes.thank you
It would be more helpful if the measurement were given. Thank you